Lite 6
by UFACTORY
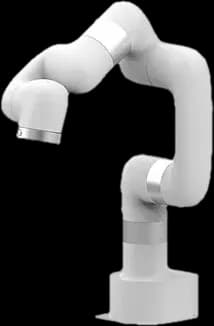
The UFACTORY 6-Axis Robot Arm Lite 6 Kit offers 600 g payload and 0.5 mm repeatability. It is the most affordable 6-axis table-size robot arm. It equips a Direct-Drive motor and harmonic drive, which balance durability and cost. Lite 6 perfectly fits space-saving tasks that are not high-accuracy sensitive.
Specifications
- Manufacturer
- UFACTORY
- Type
- Arm
- Environment
- Physical hardware
- Category
- Research Robots
- Controller
- xArm
Getting started
How do I start?
There are two different methods: manual activation and circuit design. To activate a specific
coordination of the cortical, press Shift on your keyboard and click to display the green box.
Once the green box is visible, press the spacebar to activate it manually. You can do shift and
clickon the green box to unselect the box. To press
del (fn + del for mac) would deselect all
selected boxes.For circuit design, you can use connectivity rule and quick connect. connectivity rule like a rule,
while quick connect is like a connectivity. Using connectivity rule, you can design a circuit and confirm
the information is sent from one cortical area to another. This can be automation as well.
Certain cortical areas handle specific actions.Which cortical areas are involved?
Ufactory lite6 use the Servo Control, Servo Position , and Servo Position Sensor.
Table of capabilities and cortical
| Ufactory Action | Cortical control | Brief description |
|---|---|---|
| Arms | Servo Control | Increment or decrement the position of the arm (5 servos). |
| Arms | Servo Position | Encoder position from servo ranges from -340 to 340. |
| Arms | Servo Position Sensor | Reading the current encoder position in real time. |
Connecting to FEAGI
Start the program
Run the command:
python3 controller.py (Windows: python controller.py)For Windows, Linux, or Mac with Lite6 and FEAGI
git clone https://github.com/feagi/feagi-connector.gitcd feagi/embodiments/ufactory/lite_6python3 -m venv venvsource venv/bin/activate (windows: venv/Scripts/activate)- Connect your ufactory arm.
- Run Python using the commands below:
- Mac/Linux users:
pip3 install -r requirements
- Windows users:
pip install -r requirements
- Mac/Linux users:
git clone git@github.com:xArm-Developer/xArm-Python-SDK.git xArmpip3 install -r requirements.txtcd xArm && python setup.py installcd ..- For Mac/Linux:
python3 controller.py --api_key "< replace here with square bracket>"For Windows:python controller.py --api_key "< replace here with square bracket>"
Requirements:
- python 3.8+
- Magic link (you can find this from NRS)
- CMD (WINDOWS) or Terminal (MAC OR LINUX)
- Ufactory lite6
- Git (https://git-scm.com/downloads for windows. Mac and Linux should have it by default)
Tested on Ufactory lite6 version:
Ufactory lite6
Networking section: Windows:
- Follow this instruction from quick start:https://usa.ufactory.cc/download-lite6-robot
- Go to page 3, Figure 4.1 and start from there.
- Download the ufactory studio to remove the estop. https://usa.ufactory.cc/ufactory-studio
View marketplace for this embodiment · Back to embodiment explorer